Tuesday, 9 October 2012

Abstract: Slow Shutter Speeds


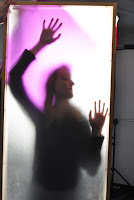
These pictures are really interesting to take and look at. We turned off the lights and shone a torch making all sorts of shapes. the way to do it is to reduce the shutter speed to 8 seconds, and then it's just like recording a video. But keep your hands still.
This photo was the first try of this, I pressed
the shutter button too late. So this is why
my teacher is a ghost beside the actual model.
This one was better because you can't
see my teacher at all, and the tourch
shows a clean line and mane of light
around the models head.
 
This photo was probably the best, because
I kept the camera the stillest compared to the
other photos. The glow of the torch is really
good in this photo, even the floor reflects it.
This was an experiment by one of us students,
who was trying to write something on the board
but the torch wasn't small enough, and he took
too long to write it, he didn't have enough time to
disaper.


This was the second one I took, which isn't
any better than the first, but I was still struggling.
I was again to late pressing the shutter button.
 
 
Evaluation
I really enjoyed this lesson, because it was wacky, crazy, and we all had a good time. This technique is really fun to use, I really like the picture of Sophie in her little bubble. The bottom one, I wasn't quite ready with setting the camera up, and I also had a shiver go down my back and that's why that one looks particularly strange.
Health and Safety
This was pretty safe, we just had to be carefull to shine the torch into the models eyes, to prevent this you could direct the torch away from the models eyes or you could simply get them to close their eyes.

Abstract: Shaky Picture Practise


This is more of a ghost effect using a
slow shutter speed. But I think it meets
the aim of the lesson.
These I took in photography lesson where our lecturer actually told us to make shaky pictures, but this is justified, because the book cover we are designing is suicide and diferrent. The shaky picture effect fits in with the theme of the book.


This was an all round bad shot. Although
the model does look very strange, I only
wish it was more focused, so less shaky.
This is probably the worst shot because
no-one apart from me and the people
that use this room will know what this
is of.


Evaluation
Apart from our photography teacher actually telling us to take shaky photos the lesson was alright, a little boring but the lesson did have an aim, and it was reached, by everyone. I also so see how these images could have made really good backgrounds or overlays to some of the designs.

Health and Safety
For this shoot all the main safety rules apply, but the main one that focuses on this particular shoot was don't drop the camera, but this was overcome by us all wearing the neak band.

Portraits

 These are my portrait pictures, here I have shown two types of light used for portraits; hard light and soft light. A photo portrait is of a human or a creature.
 
This photo is rather under exposed, although I was trying to
use the hard light, I should have used 1 or 2 shutter speeds
slower, this would allow the vital light this photo needs.

This photo was destroyed by some data loss. But the actual
lighting would have shown better if the model were to actually
look at the camera. I would have preferred to have the model
smile as well, he looks too miserable.

Again this photo has had some data loss. The lighting is clearly
visible, but again I would have preferred it if the model were to
look straight forward, in order to show the full difference of
soft and hard lighting. 

This is finally the only portrait that is almost perfect, the lighting
here practises soft light, which shows clearly. But the critises I
must make are on the camera angle, because you can see the end of
the backdrop and the wall.
 
Evaluation
This shoot went well, seeing as only Dan was the model, I would have liked some other models, just to get a bit of variety. Dan also needs to listen to instructions, like which expressions I want him to wear, what way to look. To improve I should try to become more firmer with my models, but also making sure they understand what I would like.
Health and Safety
  • Do not shine the light in the models eyes - soft or hard.
  • Manoeuvre around the model with care, beware of leads.
     

Abstract: Panning Practise Photos

These are my photos from photography, and the technique used is panning. It takes some getting used to, but the way to do it is to follow the person or animal and then when your sure your moving at the same pace as your model, your press the shutter button. But don't forget to continue following them, otherwise it won't work.

This photo is one of the funny one's, although it isn't meet the aim
of the lesson, the face my friend is pulling is weird and funny. It is
the perfect exposure.
This is probably the best one out all of these,
because it just about meets the aim, and the exposure
is correct.  

This is the worst one because it is the less focused, I think in
this one, Sophie actually stoped half way, even for a nano
second, this can make the difference between a good shot
and a bad one.
 
This is another funny photo, but it also worked
as an example of an amature panning photo. The exposure is correct, but my teacher isn't exactly frozen out of the blur.

Evaluation
Now not all of these are correct, for example, the two bigger pictures aren't right, whereas the two smaller ones are better, no the best, but better. I like the top one on the left because my model is making a strange face, same with the bottom left, we made our poor teacher run along the pavement like a loony, although he's a little blurry, I still like it, not everything can be perfect, it's just nice when it is.
 
Health and Safety
With this photo shoot, we had to make sure that the path was clear to avoid tripping.


Abstract: Freeze Frame Photos

These pictures aren't my best, I am still trying to master the art of freeze frame, I kept trying to capture at least one, but we were running out of time, and my models was getting tired of jumping.
This shot was not very good, because I didn't get a clear freeze and the exposure is a little low,
but it it almost the correct exposure. I'm sure that I had the shutter speed too slow as well. 
This shot is even worse than the one above, because the exposure is a little high, and
obviously the picture is not a clear freeze frame. The shutter speed was again too slow.
This would have to be the better one out of these three, apart from the blur quality and
the expossure being too high, yeah it's ok.


Evaluation
Now the way I have been taught to get these, is to follow the model with the camera, and just as they're about to jump, press the shutter button. I'm not sure on what the shutter speed you would have to use, that is probably what I need to play around with, although I know it has to be a really fast one.
I didn't master this technique today, but I shall try more in the future.
Health and Safety
In this photo shoot the obvious risks were falling, tripping and slipping.


Monday, 8 October 2012

Abstract: Twisting Effect Practise Photos

This is what I have nicknamed Twisting Effect Practise Photos becuase of the circular warping that has been nowehere near photoshop or any other photo editing software. It does take a bit of practise to get the hang of the technique, but these were lucky beginner captures. The way to produce this effect is to keep the lens as still as possible, and then twist the camera body. You should use possibly 1 second to 1/8 second shutter speed. Tip: the quicker the shutter speed, the quiker you'll have to twist the camera.


Evaluation
All these pictures are really cool in my opinion. This may only just be one tof the first lessons in Phtography, but this is something I really think and I belong in. My favourite photo out of these is the greeny coloured one with a few gaps, that was of the tree leaves.

Saturday, 6 October 2012

Abstract: Sillhuoette Photos

My Sillhuoette Photos
 I took these in my photography lecture. Sillhuoettes are made by having the lighting behing the person or object, they're are usually used in horror or thriller movies.
 

Evaluation
I really liked this lesson because I have learnt new ways to make people and objects look spooky.
I really like the first four images because the blury effect adds to the weirdness of the horror aspect.
But this last picture would have to be a favourite, because the red gel that I used over the camera had scratches on it, which looks like the sillhouetted figure has scared into it. Red is also a colour that sends off a mood of danger, death (mixed with the black), and blood.